Sunday, October 31, 2010

Vegetable Soup : Gluten-Free & Delicious!


Vegetable soup is one of my favorite soups to make.  I have made this soup long before Shawn was diagnosed, and with careful attention to a couple ingredients, it is deliciously gluten free.  I keep the spices the same but switch out different vegetables occasionally.  (Like peas instead of corn,  lima beans instead of kidney beans, those kind of swaps.)

It was cold and windy the other day and I got in the mood for a warm bowl of vegetable soup. So, off to the grocery we went to get what fresh vegetables we could find and suitable frozen or canned others.  This is the delicious result.

Ingredients.

5-6 medium potatoes (diced)
1 bag of carrots (peeled and sliced)
1 large sweet vidalia onion (diced)
1/2 a bunch of celery (sliced thin)
1 bunch fresh parsley
2 cans diced tomato
1 can cut green beans
1 can lima beans
1 can of corn
26 ounces Swanson Chicken Stock
26 ounces water
1/4 cup ketchup
2 tablespoons minced garlic
2 teaspoons dried basil
1 tablespoon italian seasoning
1 teaspoon ground sea salt
1/2 teaspoon garlic salt
1/2 teaspoon celery salt
1/2 teaspoon ground black pepper
1 tablespoon sugar
2 tablespoons extra virgin olive oil

I begin by adding the olive oil to the bottom of my stock pot.  Then the onions, garlic, and celery.  cook over low heat until the onions start to soften.  Next is the easy part, add all other ingredients washing and dicing the fresh and rinsing the canned in a strainer.


When all ingredients are in the stock pot, bring to a boil, reduce heat and simmer stirring occasionally.  It takes a few hours to soften the vegetables.  We had this 3 days in a row.  Shawn's Mom came over for dinner on night number Two.  She, (out of character for her) got up and went and helped herself to seconds.  :-) 

This soup gets better the second and third days reheat.  Yummy!!

Enjoy!


Sunday, October 24, 2010

Product Review: Betty Crocker Gluten Free Devils Food Cake Mix


I didn't want to bake a cake from scratch for my own birthday party, so I bought this Betty Crocker Gluten Free Cake and let Shawn bake it for me.

Shawn isn't one to cook, at all, but he followed directions and made a completely edible cake.  I was a bit surprised.  Shawn is the type of cook that literally can burn water.  The picture above is what was inside the box.  Simple enough, one bag of powder.


The directions seemed simple enough also, add the bag of powder to some water, butter, and eggs.


Pour into a cake pan and bake.

Cool and frost with a Betty Crocker Gluten Free frosting, Shawn chose fudge.

It was a bit dry, a bit bland (except for the frosting), and a bit heavy on the rice flour.  All in all, it was a boxed cake.  I think most gluten free people will be very happy with a simple store bought boxed cake mix.  It is a good substitute for made from scratch cake if you don't have the time to invest.  Shawn liked it better than I did.  Don't get me wrong.  It was good.  It was as good as most any other boxed cake mix.

I would buy it and use it again if I were pinched for time.  The light spongy textured cake wasn't the worst gluten free cake I have ever tasted.


Friday, October 8, 2010

Gluten Free Puff Pastry


I can't remember what began my fascination with gluten-free puff pastry.  I just know that I can't stop making it.

I make all kinds of foods with it, from pastries to snacks. (Pictured above is a pepperoni and cheese palmier pile.)


Puff Pastry wrapped asparagus.  Delicious!
Puff Pastry Pear Tart.  Yummy!


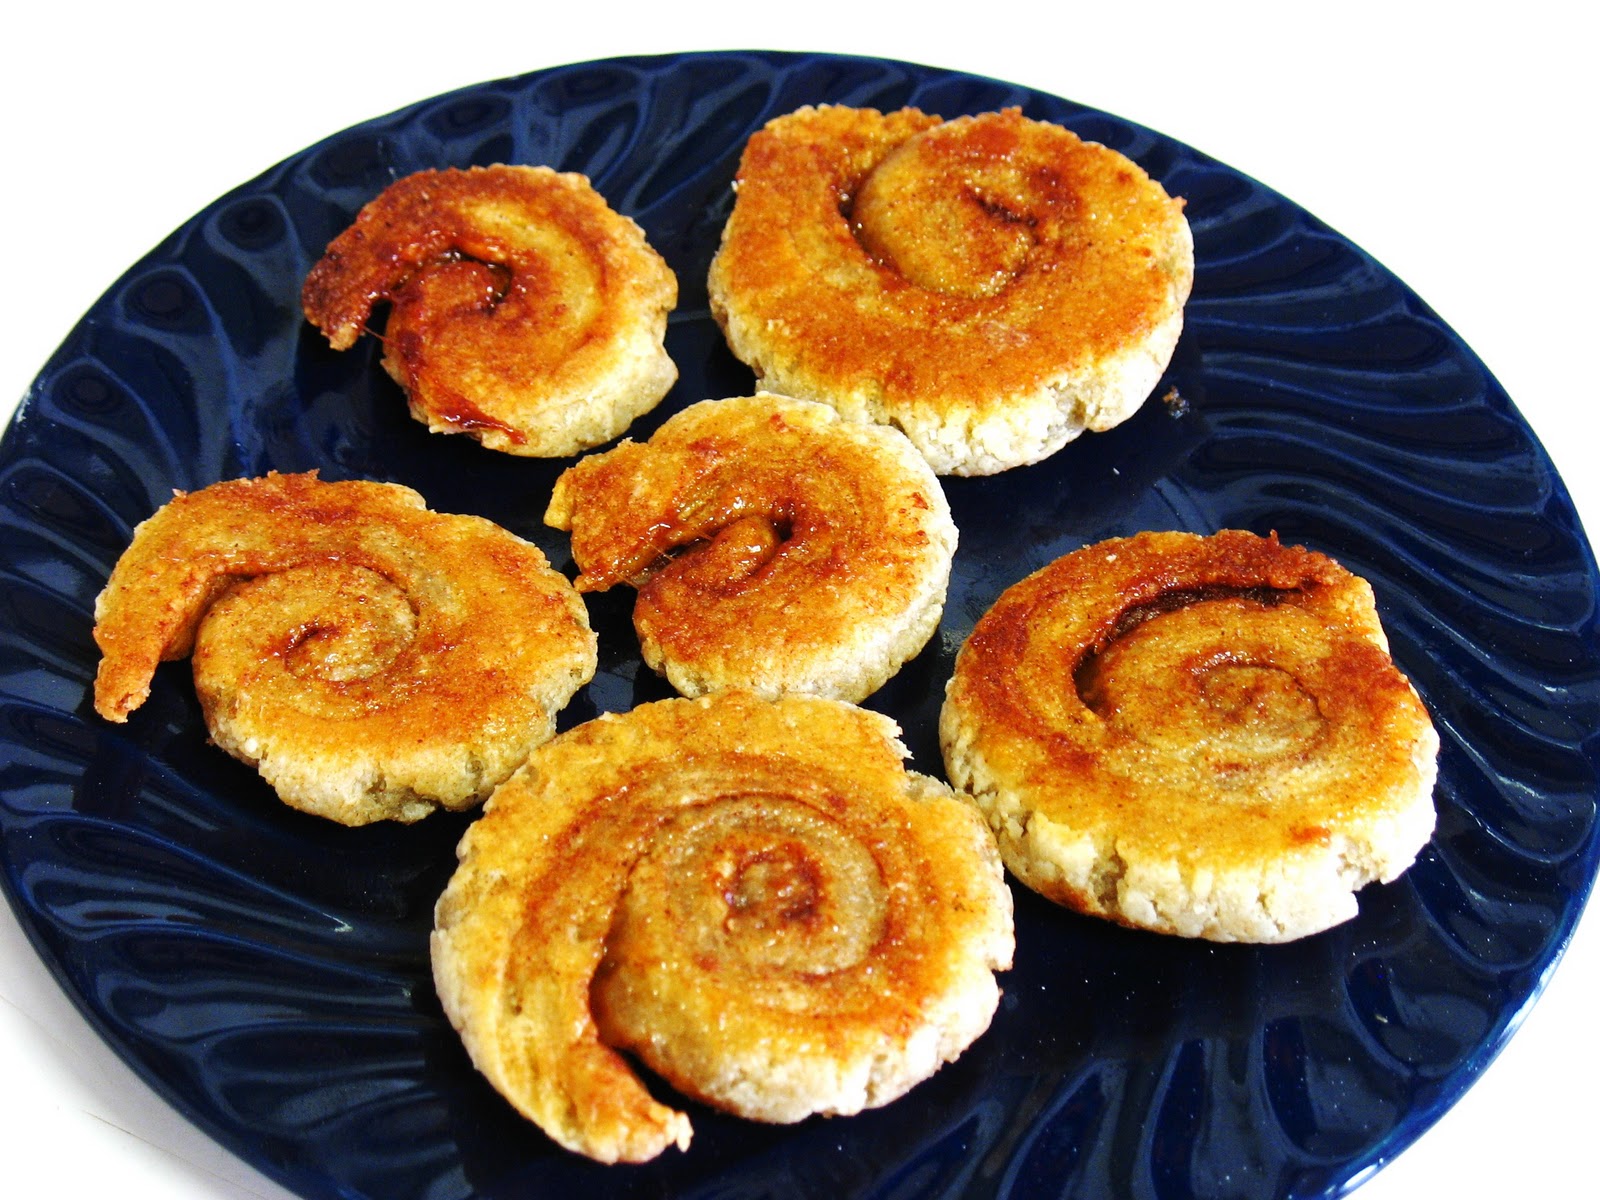
Strawberries and cream on Puff Pastry, Cinnamon Puff Pastry Pinwheels, Pear Blueberry Pie

I tried a few variations on my recipe just to be sure, like arrowroot or cornstarch. Which is truly better?  Brown Rice flour or Sweet White Sorghum flour?  Tapioca or not to tapioca, that was the question.  

So, I experimented and explored gluten free puff pastry for about a month.  

I feel that I've gained a much better understanding of pastry and the doughs required.  
I feel that I learned quite a bit about puff pastry that I didn't know and busted some myths that I had heard.
I feel.....a bit plumper after sooo many pastries.

I will try to address all the "issues" I had while experimenting but lets start with the recipe that worked best.

Ingredients

1/2 cup millet flour
1/2 cup arrowroot
2 teaspoons xanthan gum
1/4 teaspoon finely ground sea salt
2 tablespoons clover honey
3/4 - 1 cup ice water (You may not need the entire cup)
1 and 1/2 sticks of butter (12 tablespoons)
3 additional tablespoons of sweet rice flour for the butter block

The secret to puff pastry is to keep it cold, work with it cold.  I put my pastry roller in the freezer beforehand.  If you have it, roll out the pastry on a cold marble slab or metal on an ice tray.  Keeping the butter and the dough cold so they do not blend together is essential, but I am getting ahead of myself.

Begin by whisking the dry ingredients together in your stand mixer bowl.  Make a well in the center for the ice water and let the mixer gradually knead the dough into a soft ball using the dough hooks.
Dough Ball

Wrap the dough in cling wrap and place it in the refrigerator.


Now to make the butter block.  To simplify this I added the butter and the additional sweet rice flour to a ziploc bag. Flatten by lightly pounding the bag while it is sealed.  Open the bag, fold the butter/flour mixture in half, reseal the bag and repeat.  Do this several times until you have made a solid butter block.  Place this too in the refrigerator and wait for about 2 hours.


Once both the dough and the butter block are chilled, prepare your work surface. Slightly flour the work surface and roll the dough out in the shape of an X as pictured below, leaving the center part thick.  Place the butter block in the center.

Fold the sides over the center like a package. 

Tip: The four flaps that get folded over should equal the total thickness of the bottom or center of the dough.

I then turn the "package" fold side down and begin rolling into an elongated rectangle.  

Tip: Use a brush to dust off the extra flour before folding.

Fold the elongated rectangle like a business letter in thirds.


Once both sides are dusted off and folded in. Turn the dough slab so that the seam (flap) side is to your right.  Roll it out into the elongated rectangle and then fold as you would a business letter. Wrap in cling wrap and place back in the refrigerator. 

The process of rolling out and folding is called a "turn".  You need to do this 6 times, (2, 2, then 2) refrigerating after each 2 turns for about 2 hours a time.  You need to let the dough get cold enough to keep the butter and the flour layers from mixing together. After 6 turns you have a lot of layers.

Tip:  Take your time and keep the pressure even while rolling out the dough.

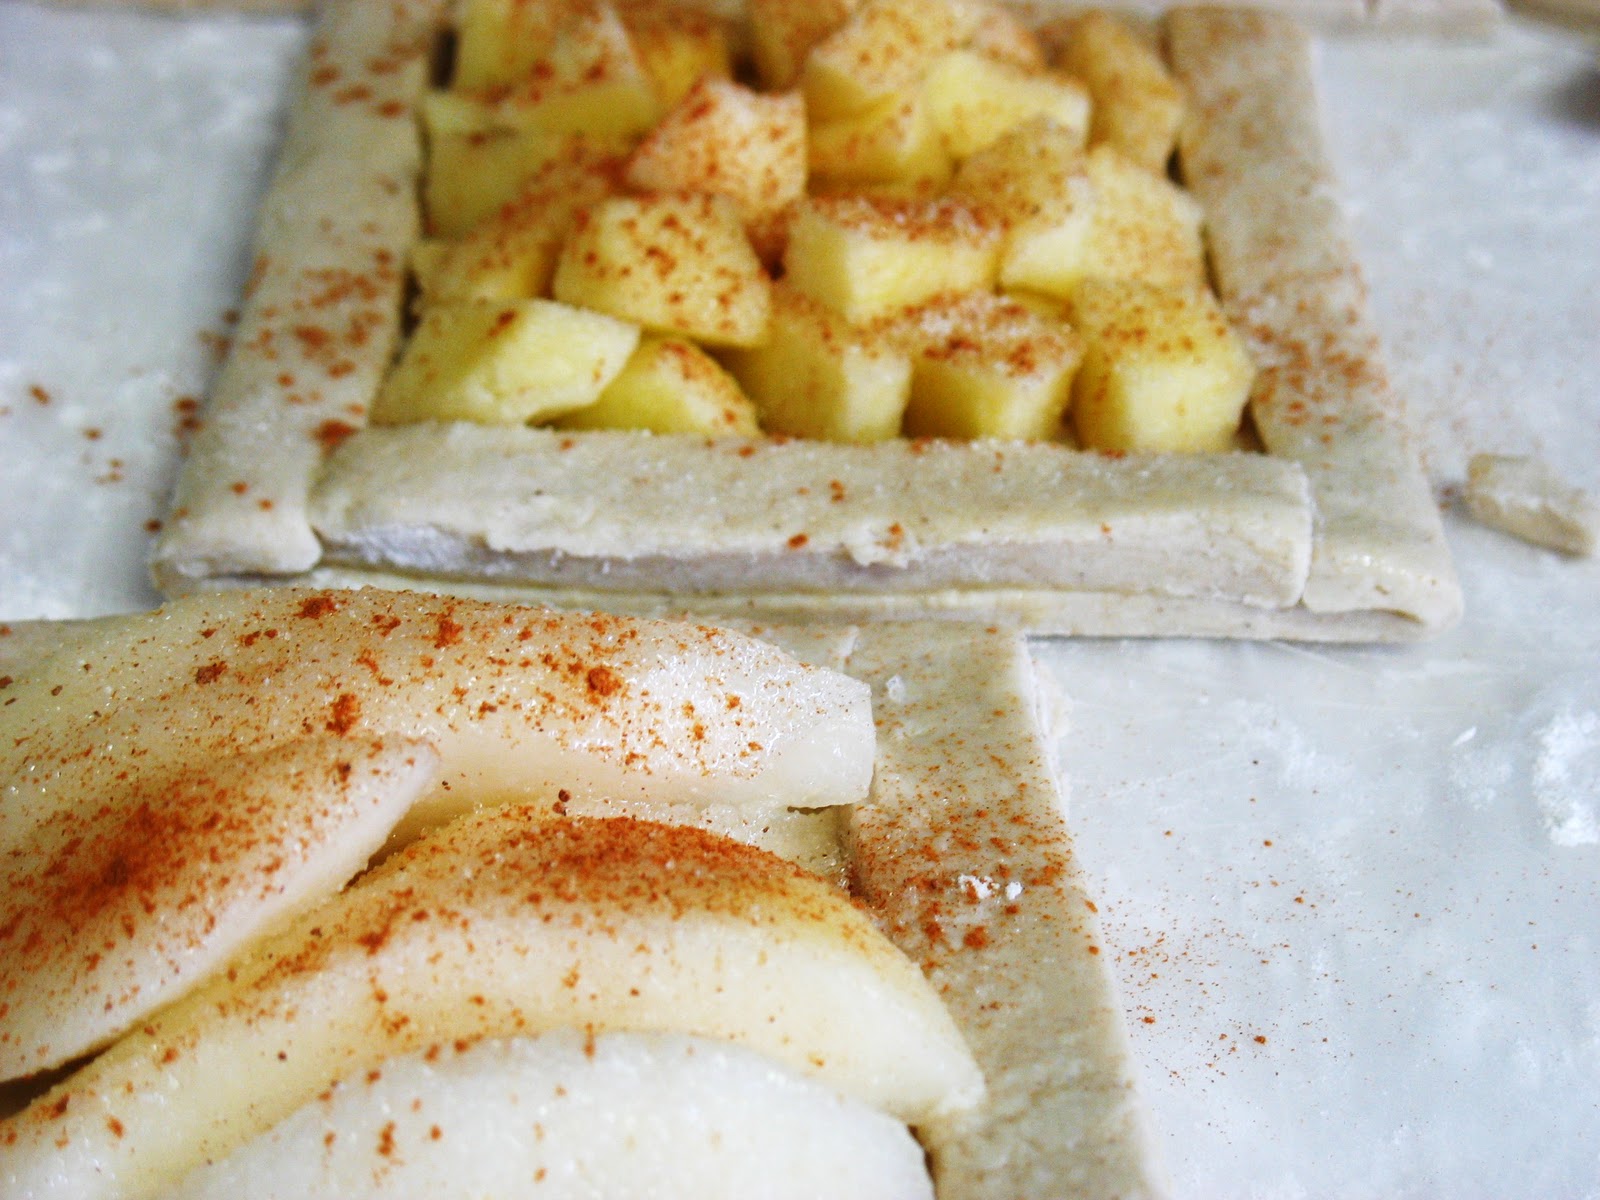
Apple and Pear Tarts
Blueberry Pear Pie

Tip:  Refrigerate the finished pastry before baking.

Tip: Watch closely, there is a small difference between too little and too long in the oven.

Tip:  400 - 450 degree oven temps recommended. 

Tip:  Fruit filled cooks a lot slower than just pastry squares.

Tip:  Brush with an egg wash for a better browned top.

My conclusion is that Puff Pastry is a bit easier than I thought it was going to be.  There is work involved and it does take a long time to complete, but most of that time is waiting on it to chill in the refrigerator.  

Thanks for reading, and  Enjoy!


Wednesday, October 6, 2010

Gluten Free Mango Cashew Chutney Chicken


This was my first chutney and, well, it turned out delicious.  For a side dish I made the puff pastry wrapped asparagus pictured, it turned out pretty good also.

Back to the chutney.  I read a lot about various chutneys and decided that I would make a mango cashew.  I had to tailor it to my personal tastes, Shawn's dislike and refusal to eat raisins,  and what was available at the local grocery.

The result.....Yummy!

Ingredients

2 chicken breasts
2 mango's, diced
2 tablespoons extra virgin olive oil
1/2 cup finely crushed cashews
1 red bell pepper, diced
1 teaspoon minced garlic
2 tablespoons apple cider vinegar
3 tablespoons brown sugar
1/4 teaspoon paprika
1/4 teaspoon ground black pepper
2 tablespoons organic applesauce
1/8 teaspoon nutmeg
5 ounces of chopped pineapple (I used snack packs)
2 tablespoon fresh chopped ginger


Place all ingredients but the chicken breasts in a medium to large saucepan and cook down, stirring often.


After about 30 minutes begin frying the chicken breasts.  Once chicken is thoroughly cooked plate and top with the chutney.  This made enough for a second night and I was glad for that.

Delicious!   Enjoy!